Field Collection
Chances are, you already have a fairly good idea of the material you want to share with the Manitos Community Memory Archive.
If you already have your material in hand, congratulations! You can move onto the Organization section.
However, if the materials you want to add are something you do not possess in high quality digital form, or have easy access to, this section is for you.
Perhaps you know someone with a great selection of photos, but they are not amenable to letting them out of the house. Perhaps you know of a collection of fragile documents, all but forgotten in the reference room of a local library. Perhaps someone spontaneously shows you a box of such treasures at a family gathering, and you know this is a rare opportunity. These are situations that call for Field Collection.
The Manitos Community Memory Project has identified 5 Tiers that define different aspects of Collection. The first three tiers are dedicated to Field Collection, the 4th is devoted to Community Digitization Centers and the 5th to a proposed Digitization Lab for time-based media and dead media formats.
Level 1 – Support For The DIY Community Documentarian
This is everyone already out there, doing the work with their own equipment. Level 1 is about improving technique and enhancing technology to improve field practices.
Level 2 – Collective Resources for the Community Documentarian – Ala Carte
For Level 1 users that might want access to specific tools to help them improve field practices. These tools are accessible by loan through a community access partner.
Level 3 – Collective Resources For The Community Documentarian – The Community Documentarian Kit
A self-contained digital memory-gathering kit, for the community documentarian that needs access to digital memory-gathering resources.
Level 4 – Library/Community Center
Non-mobile technology that may require some specialized training or staff assistance. Resources might include – flatbed scanners, an audio and video studio, a Community Access Portal for entering material into the Manitos Digital Archive.
Level 5 – Regional, Time-based And Dead Media Digitization Node
Specialty resources and expertise for the digitization of time-based and dead media formats. Film transfer and image restoration, video transfer and signal correction, transfer and remastering of audio from analog and obsolete digital formats.
To clarify, if you are able to get your materials to a Tier 4 Community Digitization Center, where you have access to high quality scanners and other digitization technology, do that!
What follows are equipment and praxis to help you get the best possible digital record in the field, in the event Tier 4 is not a realistic option.
Smartphone Field Collection
Something we realized early in our project is how many people were doing spontaneous field collecting with their smartphones or tablets, so we devoted a great deal of effort to developing a skill set and workflow for those devices.
This powerpoint provides an overview and touches on why high quality digital version are important.
A presentation of this powerpoint was given at a three day Manitos Community Memory Project ‘Training the Trainers’ workshop, August 12-14, 2019. An introduction to digitization and a video of that presentation is available here. The workshop and the videos were generously sponsored by the New Mexico Humanities Council.
Complete audiovisual documentation of the Manitos Community Memory Project ‘Training the Trainers’ Workshop is available at the New Mexico Humanities Council website here, under Workshop Resources.
Below, you will find links to some of the hardware and apps we recommend in the Powerpoint. We realize that technology and software are ever changing, so if you have new up-to-date recommendations, please pass them on through the Contact page and we will incorporate them here. One thing we recommend, is mastering why these tools improve field collecting. Familiarize yourself with the fundamentals, so you can identify those functions that you find essential when the technology changes.
To Use Your Smartphone Or Tablet For Photography
Photographs and documents are the things most of us would like to see preserved for future generations. The best way to accomplish this is with a flatbed scanner designed for photographs (see our note on flatbed scanners, below and go the Digitization workflow for best practices). Unfortunately these devices can be cost prohibitive, awkward to transport and require a computer to function, so using your smartphone’s camera is the next best thing, in the field.
Taking a photo of a photo or document can work passably well with a little forethought. However, there are two main problems that plague the smartphone documentarian, when it comes to capturing quality images in the field.
The first is the physical difficulty of lining up an evenly lit and evenly framed capture. If you’ve ever tried this, you know that the shadow of your phone and your hand, almost always photobomb your image, and framing the image or document, as the prefect square or rectangle it is, is almost impossible to eyeball.
One way to help with this is to set the photo or document you’d like to capture, atop of a neutral background (a piece of blank paper will do), on the ground near the edge of a table. Use the table itself to stabilize your smartphone, with the camera part hanging over the edge. To eliminate shadows and even out the light, you can place a pair of lamps on the ground nearby, that cast an even diffuse light over your original. You don’t want them too close, and it helps if they have lampshades or something else to diffuse the light of a naked bulb. You don’t want bright light creating glare or hotspots, just enough indirect light to cancel out shadows.
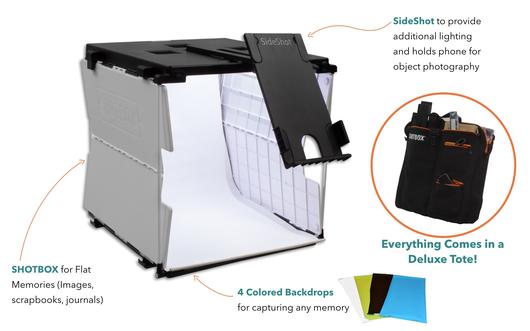
If you think you might want to do a lot of field collection using your smartphone, this easy to use portable lightbox, The Shotbox is designed for use with smartphones and DSLR digital cameras. We like the simplicity of its set-up and ease of use.
The other obstacle to archival quality images, is your smartphone’s own camera settings. Smartphone camera’s have evolved to make the act of taking photographs as easy as possible, removing operator control over traditional photographic functions like focus and exposure, and storing photo files in a highly compressed file formats, in order to fit as many photos as possible onto your phone. What this means is that, although your phone’s camera is actually really good, your phone’s software makes decisions for you and saves photos in a way that might look good as a Facebook or Instagram post, but show image degradation, once you try to do anything else with them.
If you want to use your photos in a video or to make a poster, your image will rapidly start to lose detail and pixelate. To prevent this, there are numerous third-party apps that unlock your smartphone’s ability to take better photos and save them in ‘lossless’ file formats like TIFF.
For Apple devices we recommend an app called ProCam 7, which has DSLR-like camera controls and can save photos as Loseless TIFFS. It also saves photo files to your Photo library, where they can easily be moved to your computer. ProCam 7 is so successful that there are several sound-alike imitators in the app store. The one you want is from a developer called Samer Azzam and looks like this:
Currently, Android devices do not have an option that saves as TIFF, but there are several that save RAW photo files. This article reviews several.
Another small tip that can help you with image quality, is to familiarize yourself with your smartphone’s hardware specifications. An important one is Optical Zoom vs. Digital Zoom. Optical Zoom is your camera’s real zoom setting, utilizing your camera’s physical lenses and its full camera sensor. Digital Zoom uses software to blow up a part of the image captured by your camera sensor, This means image degradation as that small part of your sensor image is scaled up to a standard image size. The original pixels are rendered larger, which is not good for your photo quality. To ensure high image quality, never capture images beyond your camera’s Optical Zoom.
For example, if i look up my iPhone’s Tech Specs, my Optical Zoom is 2x, but its Digital Zoom is 10x. If I compare photos taken at those two zoom settings, the one taken at 10x, looks very fuzzy. If I pinch and expand it, the pixels rapidly become pretty obvious. I would never want to capture a photo or document using anything more than 2x.
A Note On Flatbed Scanners
As mentioned above, the use of a flatbed scanner is vastly preferable for capturing scans of photographs and documents. The flatbed allows for an extremely controlled image capture, that eliminates all the atmospheric variables inherent in a photograph.
Please note, although many home/office all-in-one printers have a scanning bed, these are optimized for scanning office documents, not photos. If you feel like you will be doing a lot of photo or document scanning, our Tier 4 recommendation is an affordable photo-optimized scanner. The Epson Perfection V600, has color and resolution settings friendlier to photographs and comes with attachments that allow you to scan slides and photographic negatives. Most photos can be scanned at 1200dpi (dots per inch) resolution using this scanner, which is a quite respectable setting for Archival Quality. Please note, the ad copy for this scanner and others like it, often promise higher resolutions, but these are not based on an average original size. For a typical 4″x6″ original, 1200 dpi, is a realistic expectation.
Another handy device that allows you to flatbed scan in the field, in a pinch, is the Doxie Flip. Although limited to two resolution settings (300dpi and 600dpi) and saving only as lossy .jpg files, the Doxie Flip does come with the ability to scan larger documents using its ‘flip’ feature and photo-stitch software that works rather well. The Doxie Flip saves to an SD card, which is incredibly handy and frees you up from having to lug a computer around, the way a traditional flatbed scanner would.
This subject is covered in greater detail in The Workflow document on the Digitization page.
To Use Your Smartphone Or Tablet As A Video Camera
If your goal is to capture video interviews or events, your smartphone is more than capable of capturing video, but again, software limitations can limit your ability to do exactly what you need, and there are hardware limitations as well. But with the right apps and accessories, your camera can function as a full-fledged video camera.
The first thing to do is familiarize yourself with your video camera settings. If you are fortunate, your smartphone allows you to set frame rate and file type, but these capabilities are increasingly absent on newer devices.
What is most often suggested here, is to find settings that are easiest to work with across a wide variety of uses and require as little processing and reformatiing as possible, when you or someone else tried to use it later. The standard for most video is 30 fps (frames per second) and common file types are .wav, .mov and .mkv. Stick with these and you’re pretty safe. Your phone might have a proprietary file type which is why we, again, recommend third party apps to unlock your smartphone’s full potential.
An app which can not only help expand your phones ability to define these settings for yourself, but also works well with certain accessories and simulates intuitive camcorder-style controls, is FILMIC Pro. FILMIC Pro is available in both the Apple and Android app stores, is from a developer called Filmic Inc. and looks like this:

In addition to expanding your control set, FILMIC Pro allows your device live input from an external microphone like the Rode VideoMic Pro , which you can monitor with wireless headphones. This microphone can be mounted to a cradle device like the the iOgrapher, and connected to your phone using an adaptor. The iOgrapher also allows your phone to be mounted to a tripod or used as a hand-held camera with better control.

FILMIC Pro even has an additional Remote app that allows you to monitor and control FILMIC Pro on your camera using a linked tablet computer, which is very helpful if you want to set up the camera and let it capture events in a low-key way.
Most modern smartphones can hold a fair amount of video data, but it is a good idea to learn things like the ratio of minutes of video, shot at your chosen setting, to how much memory that takes up. This way you can plan for your video shoot. Its a good idea to learn how you can move video off your device to your computer, in the field, if you think you will be shooting at or beyond your smartphones capacity.
To Use Your Smartphone Or Tablet As An Audio Recorder
If you would like to record an audio-only voice interview with someone, the audio record app that comes with your device is actually quite good.
For Apple the on-board App is called Voice Memos and it looks like this:
Your Android device has several comparable options, but a popular one is Voice Recorder and looks like this :
The advantages of memo-style apps are how simple it is to use and that they typically record in Mono, which is actually better for simple voice recordings. Mono helps minimize the variation that occurs when your subject inevitably moves their head, you’d be surprised how much people do this when they talk, especially if they are excited. You can always create a false stereo for editing, by duplicating your Mono recording on both channels. To capture a song or audio of an event, you might want to record in Stereo.
The disavantage of most of these ‘memo’ apps is that you dont have control over what kind of file is created and you are often at the mercy of your operating system when getting the recordings out of your device, to use them in a video, for example, or to archive them.
For this reason we currently recommend Voice Record Pro, available in both Apple and Android app stores from Dayana Networks/BejBej, and looks like this:
Voice Record Pro gives you a lot of control over settings such as file type, recording quality. It also gives you several options for exporting your files including email, as a text message or via bluetooth to your computer.
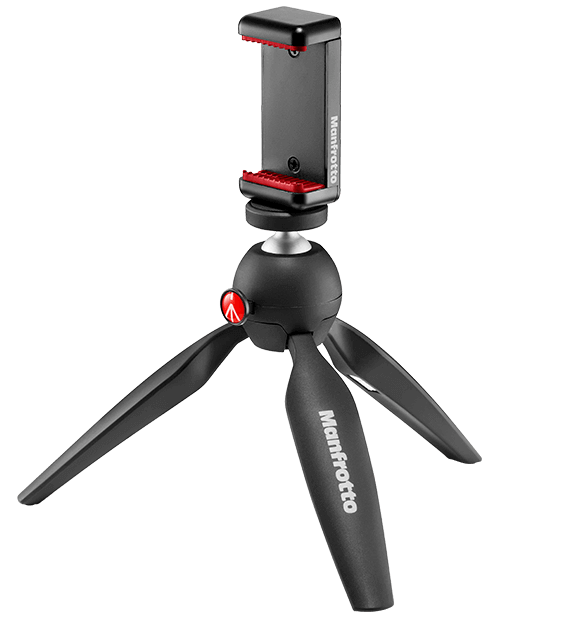
Another small thing that can greatly improve your audio captures is a smartphone cradle attached to a tabletop tripod. This gets your phone off the table, where it might pick up noises and vibrations from the table itself. We like the Manfrotto Pixi with Universal Smartphone Clamp as a tabletop tripod that can serve as a handheld stabilizer when its legs are closed.
A Note on Archival Quality
Many of the recommendations above, enable you to Field Collect at or near Archival Quality. Archival Quality can be interpreted as one of several sets standards that institutional archives use, to ensure that material in their archives is of a quality that best represents the originals and keeps it accessible and useful for as long as possible. Lossless files and saving things in common file formats help with this, as does capturing images and sounds with clarity. We hope the tips and technology above will help you on your way.
If you would like more information about archival standards, the National Archives has many educational resources about archival standards.
Now that you have your digital media collected, the next step is Organization.